Every lash artist wants to achieve that perfect bond between natural lashes and extensions. But even the best consultations and the perfect design can end with premature shedding. This stressful side effect can leave any lash artist feeling frustrated and confused.
If you’re struggling with eyelash extension retention for your clients, you’re not alone. To help bring you peace of mind, our experts have put together key lash attachment and placement tips for clients.
Continue reading to learn how to improve your retention and satisfy your clients with each application.
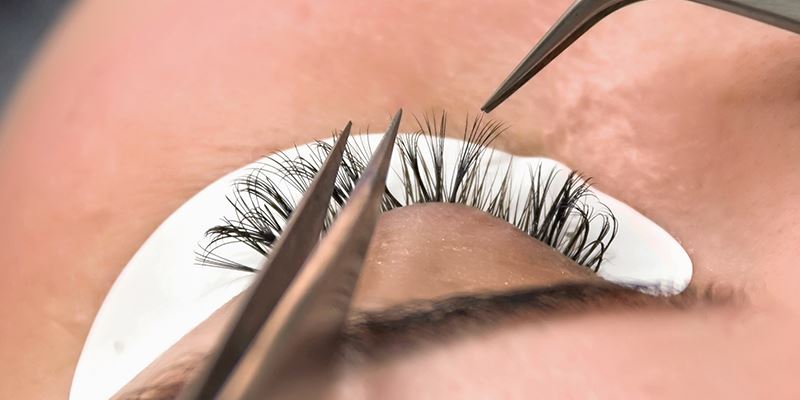
First rule: Attach lashes 0.5mm away from the skin along the lash line

Extensions must be placed along the natural eyelash, 0.5mm away from the skin along the lash line. If the extensions are not correctly placed at the distance required, this can result in two issues:
If the lash extension is placed too close to the skin, the glue can actually seep into the skin and cause pain, as well as the lash can rub every time that the client opens and closes their eye. This can be extremely uncomfortable and may even lead to swelling, redness, and puffiness to the eye area.
Secondly, if the lashes are attached too far out along the natural lash, it leaves a visible gap. When this happens, dirt and oils can become trapped underneath the lash extension. As a result, the lashes can pop off prematurely. You can even catch the new lash set on your lash brush and pull it off.
Make sure the base of the extension is fully attached
No matter what curl, length, the direction you use, it’s important to make sure the base of the lash extension is fully attached to the natural lash, at least 2mm.

If you’re not careful, you can place it at the wrong angle and the base of the natural lash can stick up. When this happens, dirt and oils can become trapped underneath the lash extension. As a result, the lashes can pop off prematurely. You can even catch the new lash set on your lash brush and pull it off.
Some natural lashes grow bent or sideways. You might be tempted to lash on every single lash, but for the sake of better attachment, leave them out! Bent eyelashes won’t give you enough bonding surface and are likely to fall off prematurely.
The 90-degree rule
The 90-degree rules simply mean that each eyelash extension should be placed at a 90-degree angle. Make sure you attach the lash at a 90-degree from the eyelid Instead of following the natural lashes’ direction or your body position towards the client.

Some designs (ie. Cat-eye) require you to place the lash wider than the 90-degree angle. However, even in this case, from the inner corner to the center of the eye should be lashed at a 90-degree angle. (The outer corner can have a wider angle to give a winged effect)
When the lash extension is placed at a wider angle than 90-degree on the inner corner, not only it doesn’t look flattering but also it can cause discomfort to the customer.
Can I attach a lash extension from the side?
There is no written rule in lash extension from which direction you must attach the extensions. It’s okay to attach from the side and bottom as well. Just make sure the base of the extension is parallel to the natural lash, and you have enough bonding surface.

Top attachment: The most common and popular method. Works especially well for the straight and downward natural lashes.
Side attachment: The advantage of the side attachment method is that it makes the lashes fuller. This works especially well on the client with not enough natural lashes. However, Do not choose this method if your client has curly natural lashes. It’s hard to get enough bonding surface from the side when the natural lashes have strong curls.
Bottom attachment: This is the second most popular attachment method after the top attachment. This works especially well on clients with upward-looking and curly natural lashes.
Extra tip. If your client has very light blond natural lashes, attaching dark color lash extensions may leave their light color roots exposed and it’s not going to look so good (especially when they grow out!).
Use the top attachment method on the top layers of the natural lashes and use the bottom attachment method on the lower layer. In this way, you have them covered in all angles!
BL Lashes Eyelash Extension Retention Checklist
Eyelash extension retention can feel overwhelming, but it doesn’t have to be. We created the following checklist to help you satisfy your clients again and again:
- Clean lashes
- Adhesive type and amount used
- Ideal lash length and weight
- Enough surface area attached
- Angled placement
- Secure bond
- Humidity and Temperature
- Client aftercare

Get Eyelash Extension Retention with BL Lashes
When lash extensions aren’t bonded correctly, your client is at risk for premature shedding. Whether you’re a new lash artist struggling with eyelash extensions or an old pro, BL Lashes is here to help you guarantee lashes that will last until the next fill.
From Lash Extensions to Lash Extension Aftercare, our team of experts is full of knowledge and tips for effective lash treatment. We know what you expect from lash products, and we make it our mission to deliver.
Shop our lash supplies today for luxury quality you can expect as a professional lash technician!
This blog is protected by copyright law. Reproduction or rewriting without permission is strictly prohibited.


